Porch Pumpkins & Winter Squash

Squash can be a bit of a puzzle. Intimidating. And rightfully so!

Most of us have terrible memories and even suppressed anxiety about that dreaded yellow/orange, stringy, watery, just plain eeeeew dish that was a staple on grandma’s Thanksgiving table.

Sure, we dress it up with oodles of sugar, spices heck even maple syrup, hide it in the mashed potatoes or smother it in gravy - We’ve tried it all….

But what if I told you

It all starts with the SQUASH!

You bet!

The Winter Squash we grow aren’t just for looks, I mean they are STUNNING but,

We are always about flavour here at MurrayHill Farm and at the end of the day, TASTE trumps all

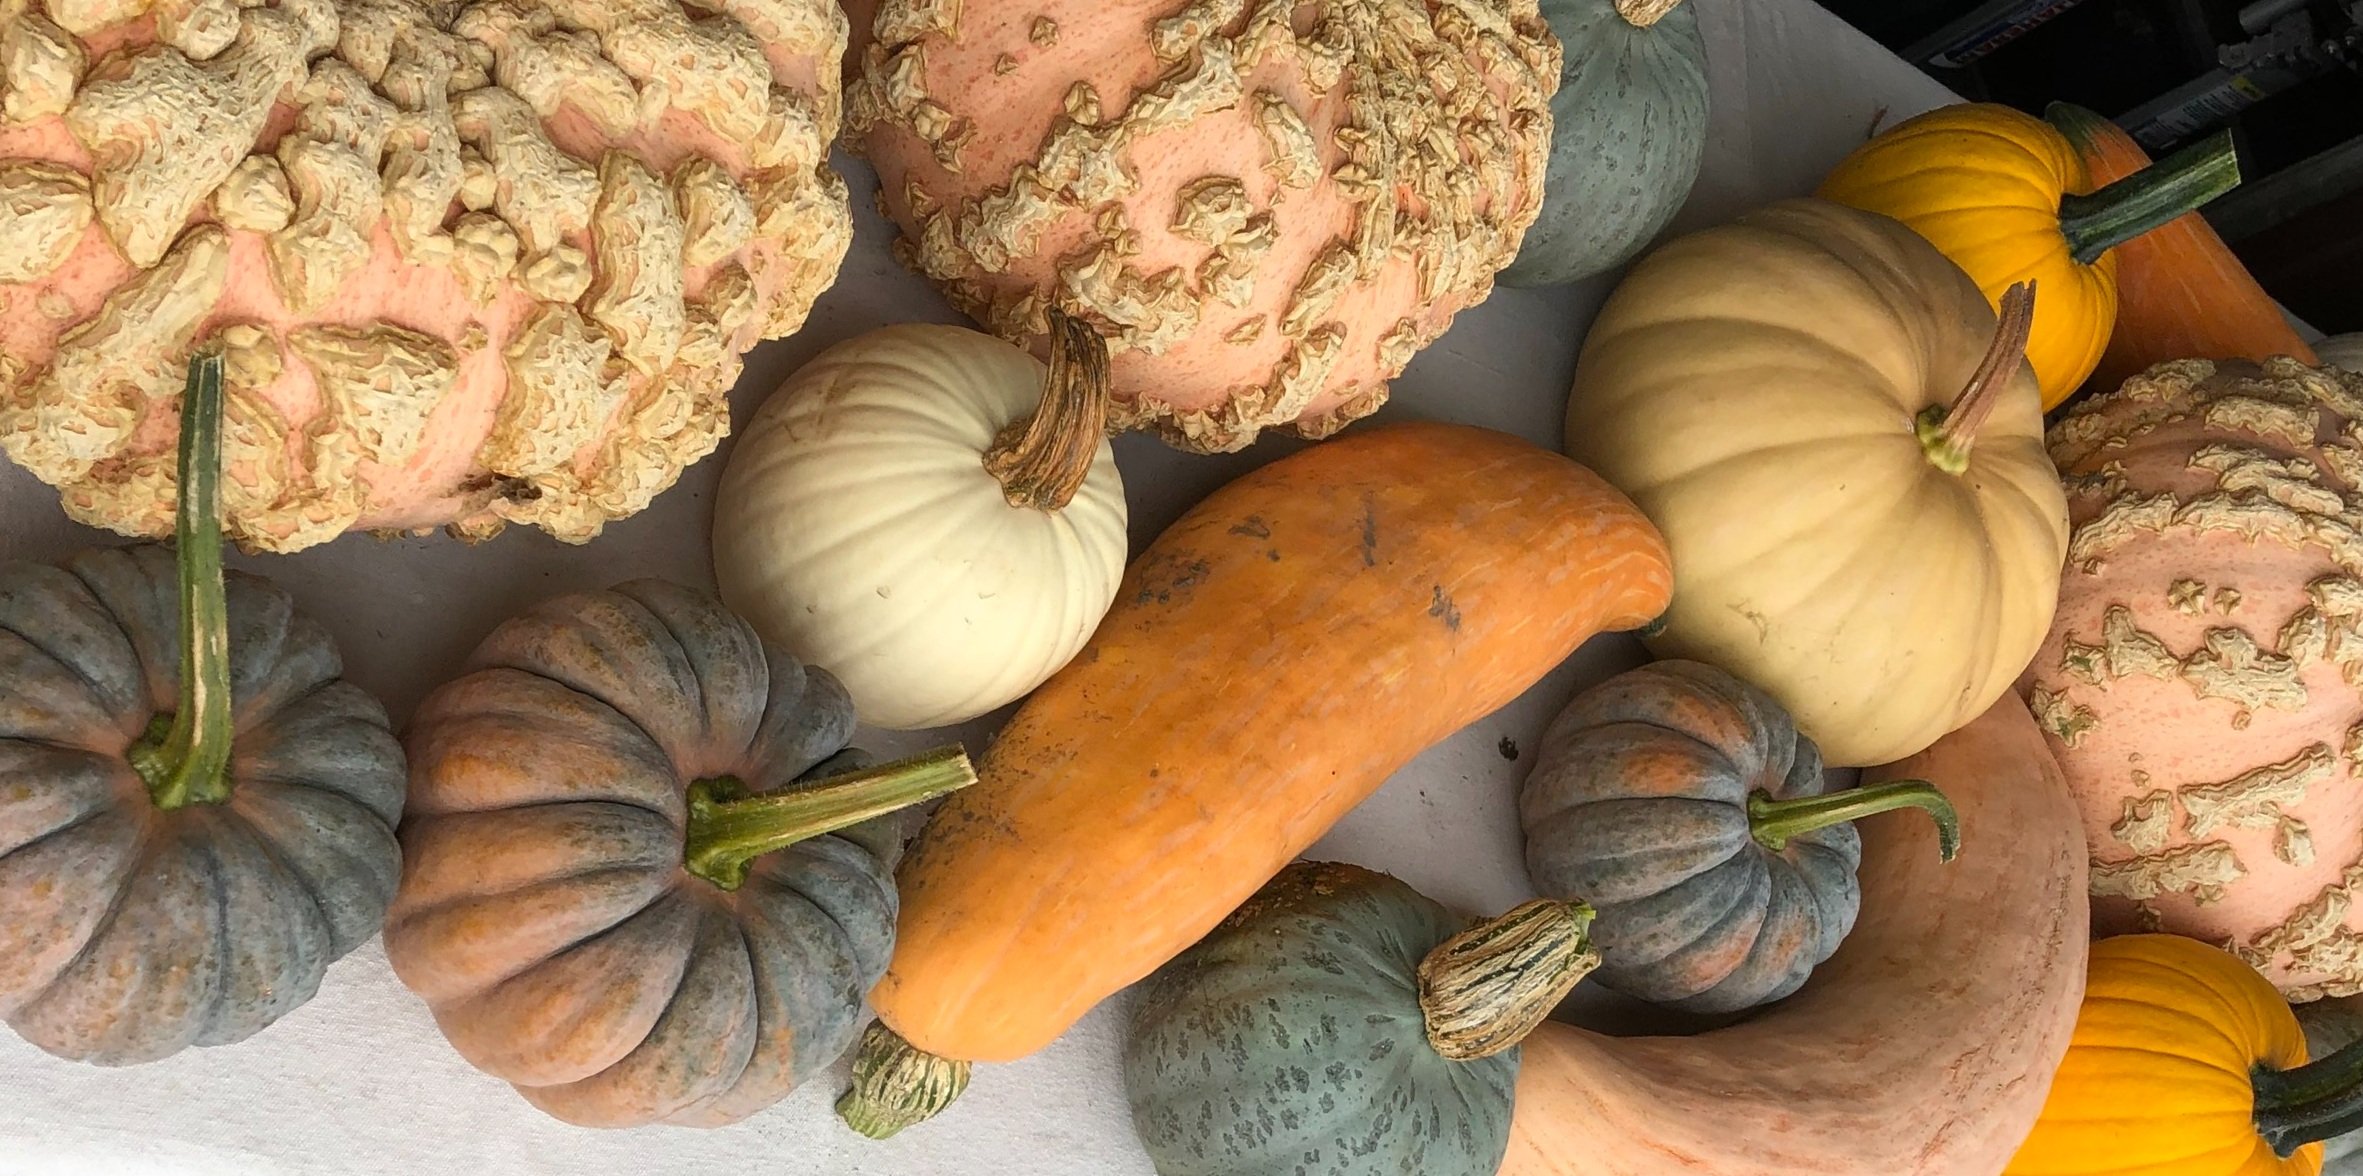
Galeux D’eysines “Peanut Pumpkin”

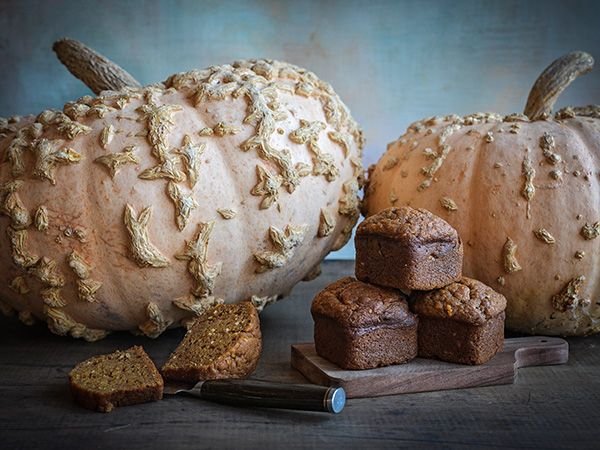
A showstopper on the porch and equally talented in the kitchen

  • Flesh is Orange, moist, sweet like apple and sweet potato.

  • Best used in soups and baking as it can be quite wet for roasting

  • Stores up to 4 months

Black Futsu Squash

An heirloom hailing from Japan, prized for its culinary qualities

  • it’s skin is edible and flesh is fine texured with a nutty flavour

  • Great for Ravioli or Gnocci

  • Best after 6 weeks and stores up to 6 months

Long Island Cheese Pumpkin

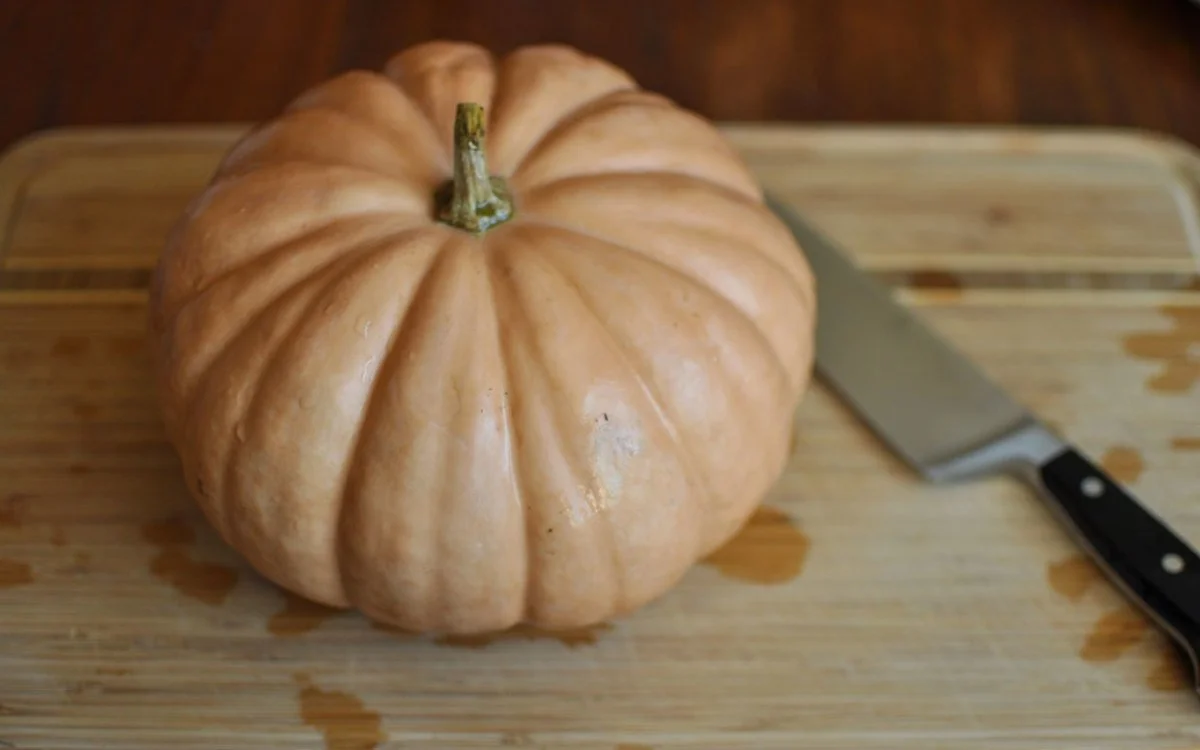
Aptly named as it looks like a wheel of cheese. Similar to butternut squash

Winter Sweet kabocha type Squash

Kabocha squash is known for its especially sweet flavor. Even sweeter than butternut squash.

North Georgia Candy Roaster

Don’t let it’s odd shape or size deter you! This is my Favourite squash to grow and is a super star in the kitchen

  • Sweet, velvety, stringless, nutty & fruity

  • Best uses - Everything! Soup, pie, roasted, mashed, pasta, sauces. Sweet or Savoury

  • Not a great keeper - best cooked within 2-3 months

Lady Godiva

Named after famed Lady Godiva who, in the 13th century, rode her horse, naked, through the streets of Coventry.

  • “Naked” seeds are perfect for roasting!

  • Flesh is of no notable, culinary use

  • Remove seeds within 2 months as they can be prone to sprouting


4 Fun Beef Dipping Sauces

I have discovered a new way to elevate the delicious steak experience… DIPPING SAUCES!

great for a BBQ, Beef Fondue or casual entertaining, dipping sauces are conversation starters and a fun way to embrace the deliciousness of great Beef.

Everyone is familiar with good ol’ garlic butter for dipping seafood but did you EVER THINK dipping other meats such as steak could be sooo GOOD?

Other cultures have been dipping their beef forever and it was Brazilian Chimichurri that inspired me to experiment with fresh flavours to highlight our beef.

The thing I love about dipping sauces is how versatile they can be

Serve them with beef, pork, chicken even fish and shrimp as a BBQ side, for skewers, or a burger condiment.

Be flexible with ingredients! Don’t be afraid to swap stuff out and try your own version of one of these.

BUY Beef Kabob Cubes From MurrayHill Farm to try today HERE

All 4 of these sauces are very different - Have fun and try them all!

Discover what your guests’ favourites are..

1: Chimichurri

  • 1/2 cup Parsley chopped

  • 1 Red Chili seeded & minced

  • 2 cloves Garlic minced

  • 1 tsp fresh oregano chopped

  • 1 tsp paprika

  • 1 tsp table salt

  • 1/2 tsp pepper

  • 1/4 cup Olive oil

  • 1 tbsp Red Wine Vinegar

(My Version) because there are endless ways to prepare this classic sauce.

2: Salty Lemon Steak Dip

Yup! Who would have thought lemon would pair amazingly with beef! This unexpected pairing is a surprise winner.

A little goes a long way with this one so definitely a dipper not a drizzler!

Pair with a TOMAHAWK STEAK! Order HERE and pick up one today

  • 1/4 cup Water

  • 1 Lemon zest and juice

  • 1 tbsp Salt

  • 1 tsp Pepper

  • 1 tsp Sugar

  • 1/4 cup Parsley

  • 1 tbsp Fresh Rosemary minced

  • 1 clove Garlic pressed


3: Umami Beef Mayo

My favourite dipping sauce for fondue!

Also shines equally bright on a summertime steak or as an original burger topping.

  • 1 cup Mayo

  • 1 Shallot minced

  • 1 1/2 tbsp Worchestershire sauce

  • 20-30 Rosemary leaves - charred

    (broil in oven until browned) then crush in mortar & pestle

  • 1 tsp Brown sugar

  • 1 1/2 tsp Capers minced

  • Fresh Pepper

This list is incomplete without a classic Aioli dipper.

4: Roasted Red Pepper Aioli

So simple with a little twist because I can’t leave a recipe well enough alone!

  • 1 cup Mayo

  • 1/3 cup Roasted Red Pepper chopped

  • 2 garlic cloves pressed

  • 1/2 tsp salt


Warning!

This may become your new OBSESSION….

You’ll find yourself dipping everything!

Pulled Beef BBQ Sauce Recipe

Celebrate the unexpected! Strawberries AND rhubarb in your BBQ sauce - YUM

This recipe is not too sweet thanks to a splash of Red Wine vinegar and….

It’s all BBQ with Worchestershire, garlic, onion, and Hot Pepper flakes!

Perfect balance of flavours to highlight any Meat on your weekend BBQ.

Its My Favourite for BBQ’d Pulled Beef made with a MurrayHill Limousin Blade Roast

We go 100% Hardwood Charcoal on the Big Green Egg but, you use what you’ve got!

Smoker, BBQ, Oven, even Slow Cooker. As long as its Low & Slow.


Once you make this BBQ Sauce, You’re going to want to slather it on everything!

Here’s How!

Strawberry - Rhubarb BBQ Sauce

  • 3 cups sliced fresh or frozen rhubarb

  • 2 cups fresh strawberries, halved

  • 1 cup packed brown sugar

  • 3/4 cup ketchup

  • 1/2 cup red wine vinegar

  • 1/2 cup bourbon

  • 1/4 cup reduced-sodium soy sauce

  • 1/4 cup honey

  • 2 tablespoons Worcestershire sauce

  • 2 teaspoons garlic powder

  • 1 teaspoon onion powder

  • 1 teaspoon crushed red pepper flakes

  • 1 teaspoon coarsely ground pepper


Directions:

  1. In a large saucepan, combine rhubarb and strawberries;

  2. Bring to a boil. Cook, uncovered, until rhubarb is tender, 8-10 minutes. Mash until blended.

  3. Add remaining ingredients; Heat through

  4. Combine with slow cooked, shredded Blade Roast

  5. Enjoy in a bun, taco, or dress up your nachos!

Its a recipe so worth trying!

Starting with the Right Cut

Shank, Brisket, short ribs, braising ribs, blade, cross rib roast……no wonder you get confused!

  • Wait a minute - the Cross Rib roast is not a Standing Rib? So what is a Prime Rib then?

  • Where does the Ribeye come from? Isn’t that what I want? 

Often we know very little about our beef options and are limited by our grocery store choices.

The luxury of buying beef from your local farmer is so rewarding.

Improve your farm-to-table experience! Choose the perfect cut of beef for your needs.

OVEN ROASTS

Classic roast for the star of your table. Cook to desired doneness and carve into thin slices.

TENDERLOIN • PRIME RIB STANDING RIB • TOP SIRLOIN • SIRLOIN TIP • RUMP • TRI TIP • INSIDE ROUND • OUTSIDE ROUND • EYE OF ROUND

Ever wanted to try sous vide? Perfect for a good ‘ol eye of the round roast! Can you say “BEST roast beef sandwiches”? 


POT ROASTS

Stew-style roast beef or pulled beef. You can make it ahead of time or simmer using a slow cooker or oven.

BLADE • SHOULDER • CROSS RIB • TOP BLADE • CHUCK EYE • BOTTOM BLADE BONELESS • BRISKET BONELESS


Brisket is the whole point of having a smoker Lol!

ROTISSERIE ROASTS

Summer option for bbq roast beef. Can be cooked with or without a rotisserie.

TOP SIRLOIN • SIRLOIN TIP • INSIDE ROUND • OUTSIDE ROUND • PRIME RIB • CROSS RIB


GRILLING STEAKS AND MEDALLIONS

Very tender. Simply season and sear.

TENDERLOIN • STRIP LOIN • BOTTOM SIRLOIN • T-BONE • WING • PORTERHOUSE • TOP SIRLOIN • GRILLING BACK RIBS RIB • RIB EYE

I can’t have T-bones and tenderloin steak in my custom mixed 1/4 order? 

T-bones are made up of the tenderloin and striploin steaks. You choose a bone-in or boneless option

MARINATING STEAK AND MEDALLIONS

Best marinated before grilling. It takes time but can create the boldest beef flavour.

Check out our Easiest Marinade EVER!

SIRLOIN TIP • EYE OF ROUND • INSIDE ROUND • OUTSIDE ROUND MARINATING STRIPS & CUBES • FLANK SKIRT • MARINATING SHORT RIBS

SIMMERING STEAKS AND STRIPS

Best simmered low and slow. Perfect in stews.

BLADE • CROSS RIB • BOTTOM BLADE • TOP BLADE • BRISKET • SHANK STEAK (OSSO BUCO)

STEWING BEEF

Short ribs and stewing beef make delicious one-pot dinners. Slow simmer on stove top, in the oven or in a slow cooker.

SIMMERING SHORT RIBS • STEWING BEEF CUBES • CHUCK TAIL FLAT • SHANK CENTRE CUT • OXTAIL

QUICK-COOK, FAST-FRY AND STIR-FRY

built for speedy suppers!

FLAT IRON • SKIRT STEAK • FAST FRY STEAK • FLANK STEAK

Thin, ½” steak, lightly tenderized, and incredibly flavourful, cooks up in minutes! Perfect for philly steak sandwiches, fajitas, and stir frys or a classic steak & egg breakfast!


GROUND BEEF

Packed with beef flavour and fast and easy to cook.

GROUND SIRLOIN • GROUND ROUND • GROUND CHUCK • EXTRA LEAN •

“Limousin Ground Beef tastes like STEAK! It’s like discovering a whole new product…”

“Wow! Ground that doesn’t shrink and no nasty grease to pour off!”

Tips for the Best Beef Gravy!

Let’s face it. Roast beef is not the same without gravy and not all gravies are created equal

You know, that heavenly liquid spooned over potatoes, meat and decadent Yorkshire puddings.

It’s what makes roast beef dinner one of my absolute favs!

After seeing gravy made with that dreaded Bisto (eeeew) It occured to me that I needed to share my method of making the best mouthwatering roast beef accompaniment.

This method is for a traditional roast of beef cooked in a hot oven - not a slowcooker meal with lots of liquid or pot roast dinner that falls apart on the plate.

You’re going to want a roast that is cut out for this meal. Obviously a Prime rib or a tenderloin is going to shine but don’t discount less expensive cuts too! Here are my recommendations:

roast beef.jpg
 

Need a great roast? Get yours from our MurrayHill Market HERE

Start with the right sized roasting pan.

It doesn’t have to be deep nor have a lid but it should be heavy and safe for use on the stovetop. I have often used a trusty cast iron fry pan to roast my beef.

IMG_7962.jpg

My preference is cast iron but a heavy SS or aluminum will also work.

It should be large enough that it doesn’t crowd the roast and leaves a little space - but not so large that there is too much room for drippings to thin out and burn while roasting.

Skip the roasting rack and lid - you want the meat in contact with the pan and the steam to get out

Its all about the Sear! This step is smokey but essential

Use grease with a high smoke point for searing like good ol’ bacon grease. Only add butter at the very end of the browning process as it will burn and spoil the flavour of the gravy.

IMG_7964.jpg
IMG_7973.jpg

Season liberally with salt and freshly ground pepper and brown very well on all sides.

Tip: when browning, place meat in pan and do not move until it ‘releases’. Once the surface is caramelized it will ‘let go’ and you can flip to the next side.

IMG_7975.jpg
IMG_7990-1.jpg

Once the entire surface is well browned, I like to add 1/4 to 1/2 cup of water before putting the roast in the oven. this will prevent all that caramel goodness from burning while roasting.

If you wish to add fresh herbs like rosemary or thyme, I do it now.

I roast my beef at 350 F for about 20min/pound or until the internal temp reaches 130F. This results in a beautiful medium-rare roast the is delicious hot or cold.

IMG_7993.jpg

As you can see, after a mere 45 min, the amount of yummy drippings in the pan.

IMG_7994.jpg

There will be a small amount of fat on the surface and this is what you want to use to make Yorkshire puddings!

IMG_7996.jpg

Remove the roast and set aside tented with foil to let rest while you make the gravy.

Skim as much of the clear fat off and add 1 1/2 cups of water or home made beef broth to the pan (I use water more often than not). Return to hot stove top and bring to a simmer while whisking all the little brown bits off the bottom and sides of the pan.

Salt to taste - you will likely need to add a fair amount.

Next step is thickening the gravy.

I use a mixture of flour and water and have had success with gluten free flour as well as cornstarch. Start with a couple of tablespoons of flour in a small jar and gradually add water to make a paste. continue to add water and shaking or stirring until it reaches a creamy consistency.

IMG_8010.jpg
IMG_8011.jpg
IMG_8012.jpg

With the gravy drippings simmering, slowly whisk in flour and water mixture until gravy is desired thickness.

Sometimes, if I want a little more gravy and the drippings have enough flavour, I can add a little more water and thicken again as long as it doesnt dilute the flavour too much.

IMG_8016.jpg

This is the kind of gravy flavour you will remember as a kid at Grandma’s sunday dinner

and you’ll want to spoon it all over everything- especially Yorkshire puddings!

You can Buy the Perfect Roast for your special gathering from the MurrayHill Market HERE

imagine a trip down memory lane with a traditional roast beef feast and wow them with the best gravy ever!

roast beef dinner.jpg

The Beef Flavour Wheel

There are flavour wheels for wine, coffee, and even chocolate has product descriptors that will make your linguistic mind spin.

Copy of Fresh Earthy Dynamic Buttery Melting Caramel Clean Lingering.png

A while back, I was doing some research into culinary experiences with beef and I ran into the neatest little tool…..

A Flavour Wheel for Beef!!

….There is a link at the bottom to the coolest online beef tasting tool with recipes!!

Flavourwheel-1-768x801.jpg

But for Beef? Why NOT! Researchers have detected over 800 flavour profiles in beef - in fact it is one of the most complex things we consume.

flat iron steak.jpg

Now, without sounding like a beef snob LOL, the fact is, FLAVOUR is what we are all about at MurrayHill!

Want to have some fun and try a Beef Tasting Experience? Here’s How:

  1. Start with a good steak.

That doesn’t mean you have to spend an arm and a leg on Tenderloins or Ribeyes for the whole family. 

A perfectly delicious Top-Sirloin Steak is a great choice and affordable for a fun, taste-testing get together.


If you’re going to the effort of hosting a flavour tasting event, I encourage you to source out some great quality meat from your local farmer like MurrayHill’s Limousin Beef.

Your farmer will be able to tell you about the beef like what breed it is, how it’s raised and how it gets from field-to-fork.


2. Cook it simply.

Season your room temperature beef with a little salt and pepper and grill or use cast iron until medium - rare or medium at most. Let it rest, tented with foil for 5 minutes before serving.

bbq steak.png

There are 2 basic categories when doing a taste-test on beef :

  1. Texture and mouthfeel 

  2.  Aroma and flavour

Be a snob! Smell it first, Poke at it.

Flavourwheel-3.jpg

Pay attention when cutting a piece. Then smell it again and put words to the aromas when you first take a bite.

While consulting your scrabble dictionary make note of the texture and mouthfeel of your bite of beef. 

 
Flavourwheel-2-768x820.jpg


How about the Flavour?

Is it meaty, herbaceous, or sweet like caramel? How about buttery with lingering flavours of honey or drippings? 

I have found an interactive flavour wheel that will also take your results and suggest pairings for your meal.

(I don’t get any kick-backs -I just think its COOL)

Check out this FREE Online Flavour Wheel that teaches pairing and comes with RECIPES!

CLICK HERE but before you go….


Remember, there are no right or wrong answers!

LIMO.png

This is simply an exercise in awareness and culinary enjoyment.

Have fun with it and remember, everyone has different taste and smell receptors. Let’s broaden our red meat experience and savour the flavours of the beef we are eating. 

Steak like the Keg. Everytime!

Untitled design-10.png

Everybody Loves a Great steak!

For many, cooking a delicious steak can be a bit daunting.

“Don’t overdo it!” and “Cook it hot!” and time it right so you can “let it rest!”

It’s no wonder we hesitate at the thought of indulging in a spendy cut of beef.


This easy marinade will put your mind at ease

The easiest, most versatile steak marinade Ever!

Starting with a great steak is easy with beef from MurrayHill Farm. 100% Limousin (that’s the breed of cattle) beef is inherently lean, naturally more tender, and renowned for its luxurious flavour - no matter what the cut!

There’s a cut to fit every budget and this recipe will make even a Fast-fry steak taste like you’re eating at The Keg.

People say even our burgers taste like steak!

Easiest Steak Marinade

INGREDIENTS:

  • 1/3 cup soy sauce

  • 1/4 cup red wine vinegar

  • 1/3 cup olive oil

  • 1 Tbsp Worcestershire sauce

  • 1 Tbsp minced garlic

  • 1 Tsp dry mustard powder

  • 1/2 Tsp onion powder

Whisk all ingredients together and pour over steaks in a large ziplock baggie. Let sit for min 1 hour and up to 24 hours.

It’s as simple as that!

As usual, my recipes can be altered and improvised if that’s your thing. Feel free to add ginger in place of garlic, a touch of sesame oil, maybe even something sweet like pineapple juice and out the Worcestershire.

The sky is the limit with this one but I find usually Less Is More when it comes to marinade ingredients.

Let’s face it, you still want those amazing flavours of your beef to shine through!

Great Tips:

#1 Judge with a thermometer.

You can’t second guess the temperature or yourself..

Untitled design-11.png

125-130 Rare

130-135 Medium Rare

135-140 Medium

140-145 Medium Well

145-150 Why would you do this?!

#2 End with Butter

Whether you’re searing in a cast iron pan or on the BBQ, be sure to add a pad of butter at the very end of your cooking time. It will add a nutty sweetness and highlight the silky texture of your Limousin beef.

#3 Garnish

with Fresh Herbs, Scape Pesto, Buttered Mushrooms or Classic Chimichurri made with fresh parsley and garlic

Finish with Flavour

Chimichurri is the BOMB! Stay tuned for that recipe!

Untitled design-4.png

Your Tastebuds will thank you for it!


Green Garlic Pesto

Untitled design-8.png

Green garlic is more mild than scapes or cloves and has that lovely green-tasting punch - the very essence of spring eating. 

One of the greatest things about this time of year is my hubby’s renewed passion for all things BBQ! That little extra enthusiasm seems to add a new energy to mealtime preparation and gets me inspired to try new things.


Let’s face it, most men would be content to eat steak, a microwaved potato and a slice of tomato every night of the year. But if you want to dress up your man’s BBQ, give my version of Green Garlic Pesto a try!

Easy and beautiful in it’s simplicity, Green Garlic Pesto’s bright flavour is a perfect accompaniment to our pasture-raised beef.

Untitled design-4.png
 

Ingredients

  • 4 - 6 stalks Green Garlic, roots trimmed, rough chopped

  • 2 cups Spinach. You can also use any dark, leafy greens like radish or turnip greens, kale, or collards, chopped

  • Olive oil

  • Salt

  • Pepper

  • Small splash of wine vinegar or lemon juice

In a food processor, pulse young garlic until fine and drizzle a little olive oil to get it moving.

Add spinach, salt and pepper and process until pasty. Add a splash of vinegar or lemon (maybe a tsp)

Continue to slowly add enough oil to get a soft, spreadable consistency. That’s It!

I know, there are barely any measurements here! Thing is, this recipe is so versatile that you can do WHATEVER you like with it!

You can add any number of ingredients to suit your taste. Pine nuts or walnuts,  pepitas (pumpkin seeds), parmesan cheese, a small jalapeno, or even avocado.

Add 1 cup of parsley for a chimichurri twist or basil if that’s your thing

Don't worry too much about the details, and start thinking about all the tasty ways you're going to use this amazing spread!

All options will add that Fresh-from-the-garden flavour to anything BBQ and more. 

Think Meat! Like a Juicy MurrayHill T-bone or Ultimate Limo Burger

Kabobs of any sort and more! Pasta, potatoes, eggs, or homemade pizza or naan bread. Garlic toast, bagels, or toss into your favourite dressing or marinade!

Enjoy! And don’t be afraid to try new things!!

Untitled design-6.png

Feel free to check out our MurrayHill Online Market to see what’s in store this week!

Visit your Local Farmer Today!


Mmmm.. Beef Bone Broth

How and Why You Should Make it Today

beef broth.jpg

Delicious, restorative and nourishing, Bone Broth is everywhere these days- and understandably so!


This highly nutritious stock is commonly used in soups, sauces, and gravies. It has also recently gained popularity as a health drink.

Bone broth is essentially the same thing as beef stock: bones in water that are simmered low and slow with or without vegetables.

It’s restorative, said to help with digestion, joint health and a myriad of other health benefits. It’s also said to create radiant looking skin.

No wonder everyone’s trying it!

broth in cup.jpg

enjoy a warm cup of bone broth as an evening beverage and do away with making a complex soup.

IMG_7414.jpg

But you could throw in some broken spaghetti noodles, a few meaty bits from the bones and a handful of spinach or kale and make it modern ‘Cup-a-Soup”


Making bone broth is really very simple.

There are many recipes online, but most people don’t even use a recipe. All you really need is a large pot, water, vinegar, and bones. I love my Instant Pot for this!

Our limousin Beef bones are the best for making broth as they are naturally very lean.

They make for a flavourful broth that tastes clean and not greasy.

To get you started, here’s an easy recipe you can follow

INGREDIENTS

  • 3 pounds MurrayHill’s Limo beef bones

  • 1 medium onion, halved and unpeeled

  • 1 garlic head, halved crosswise

  • 1 celery stalk cut into 2-inch pieces (optional)

  • 2 bay leaves

  • 2 tsp black peppercorns

  • 1 tablespoon cider vinegar

Roasting soup bones in the oven first gives hearty beef flavor to this basic beef stock. In addition to soups, use the beefy broth to provide extra flavor in stews, gravies, sauces and vegetable dishes. —Taste of Home Test Kitchen

IMG_7407.jpg
  1. Preheat oven to 450°. In a large roasting pan, bake soup bones, uncovered, 30 minutes.

  2. Using a slotted spoon, transfer bones to a large Dutch oven or an Insant Pot. Add remaining ingredients and enough water to cover bones by about an inch.

  3. Cover and simmer, slowly and slow cook for 12-18 hours. (This is where the Insta Pot or slow cooker really shines). *If you are using the stove top or oven, be sure to add water as necessary

IMG_7410.jpg

4. Remove beef bones & cool. Remove meat and save for another use and discard bones. Strain broth through a cheesecloth-lined colander, discarding vegetables and seasonings. If using immediately, skim fat. Even easier - refrigerate a few hours or overnight and remove cold fat from surface.

5. Broth can be covered and refrigerated up to 5 days or frozen 4-6 months.

Why go through all that time & trouble?

Firstly, making broth at home with MurrayHill beef bones ensures the most delicious and nutritious product! No additives, or chemicals - just wholesome farm-raised ingredients that you put in.

Clean, Farm-raised Limousin Beef Bones

Clean, Farm-raised Limousin Beef Bones

No bones about it!

Bone broth is rich in minerals that help build and strengthen your bones. It also contains many other healthy nutrients, including vitamins, amino acids, and essential fatty acids.

The gelatin in bone broth supports healthy digestion. Leaky gut? Irritable and inflammatory bowel diseases? This may be beneficial!

Fight inflammation, support joint health, and…

Glycine has been shown to promote sleep!

We could all use more of that these days! Taking it before bed may help improve quality of sleep, mental function, and memory.

broth in jar.jpg

Try making some today!

Here’s a link to buy Limousin Beef Bones from our farm for amped-up flavour without the grease!


My 5 Favourite Veggies to Grow

Here at the farm we grow about 50 different varieties of vegetables. It’s just so hard to resist trying the newly discovered, most improved and admittedly, the ‘coolest’ looking heirloom veggies.

Over the years, we have lucked out falling for the tempting photos of fantastically coloured varieties and descriptions that hail the best flavour EVER.

As a challenge, I decided to compile a list of my 5 favourites - ones I wouldn’t do without in my garden.

What only 5 you say!! Not an easy task but

If I HAD to pick only 5 these would be them.


  1. Rainbow Carrots

Hands-Down, carrots are my favourite and this variety checks all the boxes. They are sweet, disease resistant, uniform in size and maturity with 4 different colours in one packet. The great thing about carrots is you can start them early, harvest them late, and store them perfectly all winter!

Find these at Vesey’s Seeds

rainbowcarrot-12770a-image1-1277_newrainbow.jpg
 

Be a part of our farming experience and share in our garden’s bounty!

 
IMG_4536.jpg
 
tomatoberry472.jpg

2. Tomatoberry Tomatoes

I think if we had a signature product, this would be it.

This gem of a tomato has been with us from the very beginning and will always have a place in my hoop-house! Indeterminate plants need staking and pruning otherwise becoming unruly but the extra effort is well worth it.

Try Them at Burpee Seeds

3. Jade Green Beans

There are so many kinds of green beans!! We found these by chance and have never looked back. They are beautiful, delicious no matter what the size, and produce over a long time. They do have white seeds though, so wait until the soil warms in June to plant or they wont germinate!

00016g_01_jade.jpg

Jade is a popular variety. Here is but one way to get them Stokes Seeds


4. Cortland Onions

Really! Onions?! I know onions are pretty boring so how in the world do they make my top 5?

2684.jpg

Truth is I use onions ALL THE TIME!

Virtually every meal I make starts with an onion and this is the best tasting, most versatile variety I have found. It’s firm, juicy, not too pungent and most importantly, it stores fantastically for a whole year! If you still think “an onion is an onion”, this one is one to try. It will change the way you look at them forever.

Check out Cortlands at Veseys Seeds

2288.jpg

Touchstone Gold Beets

Source these beauties from OSC

I just had to include a beet in my top 5. They are fast, easy and so tasty fresh from the garden. You can eat the tops just as readily as the roots which can be steamed, roasted, pickled or eaten raw. Picking just one beet from the dozens of varieties was easy. Bright yellow on the inside with orange skin they are stunning on a plate! I find they have the best flavour of all and they don’t stain your hands.

Agree that these look delicious but can’t manage a garden this year?

Don’t despair! Stop by the farm this summer so you can still enjoy these amazing ingredients!

These 5 Favourites and more will always have a place in our garden and at your table!

1ec045cd-049b-4ce6-89cd-3377b22ae669.jpg

Farm-Fresh Holiday Egg Nog

Very few things say Christmas like Egg Nog.

0949-Alton-Browns-Egg-Nog_resized-1024x1024.jpg

We grew up with eggnog, the kind you buy in a carton, and every Christmas holiday we kids drank up as much of it as we could.

It’s funny though how our taste buds change into adulthood and suddenly we crave more refined things. Eggnog from the grocery store is no exception!

Real eggnog is nothing like it.

images-19.jpeg

  • You don’t have to cut it with milk just to get it down the hatch.

  • It’s not so sweet you get the sugar sweats.

  • It’s light and frothy and yolky in the way custard is.

  • It’s fresh-tasting and boozy (if you choose).


I’ve been wanting to make this for awhile.

My daughter says I won’t ever buy the stuff again and heck why would I with all these farm-fresh eggs around here!

If you need a source of Farm-Fresh Eggs, order yours on-line at our Virtual Farm Market HERE

So, here we are, days before Covid Christmas, and I just recieved requests from a dozen hometown girlfriends during a zoom call for the recipe.

I have adapted this recipe from our Cooks Illustrated cooking ’Bible’ - Really the most comprehensive literature on cooking that I own.

df6edca2-9134-4bb8-95ee-8aa858571c5f--2016-1115_how-to-make-eggnog-without-a-recipe_james-ransom-059.jpg

Now between the heavy cream, raw eggs and alcohol, its easy to see how home-made eggnog can go wrong. But when done right -its a real winner!

Raw Eggs! eeewwww you say. I’ll tell you, I don’t hesitate to eat a raw egg in a smoothie but I get it if you’re a little apprehensive. This cooked version is custardy, rich and sweet with a hint of salt to improve flavour and puts aside your worries about un-cooked eggs.


You can omit the alcohol to create a DD and kid friendly drink but decrease the cream to a 1/4 cup to keep the right consistency.


Ingredients

images-14.jpeg

6 large farm-fresh eggs + 2 golden yolks

1/2 cup + 2 tbsp sugar

1/4 tsp salt

4 cups whole milk

1/2 cup brandy, bourbon, or dark rum

1 tbsp vanilla extract

1/2 tsp ground nutmeg +extra for garnish

1/2 cup heavy cream


Directions

1. Whisk eggs, egg yolks, sugar, and salt in a heavy saucepan. Stir in milk, 1/2 cup at a time, blending well after each addition. Heat slowly over lowest heat possible, stirring constantly until custard reaches 160 degrees, thickens, and coats the back of a spoon (25-30min).

2. Pour custard through a fine mesh strainer into a large bowl, stir in brandy, vanilla and nutmeg.

3. Cover with plastic wrap and refrigerate until well chilled, at least 3 hours or up to 3 days. 

4. Just before serving, whip cream in a medium bowl to very soft peaks and gently fold into custard mixture until incorporated. Serve in a chilled punch bowl or cups and garnish with nutmeg.

Off chance you have eggnog left over? Unlikely but guess what?

You can Bake with Eggnog!

images-16.jpeg

Yup! That’s right

Homemade eggnog might have a little bit of a different thickness than store bought milk or store bought eggnog, so a recipe might need a little tweaking. But in general, you can often replace milk with eggnog in baked goods. We’ve also found you can reduce the sugar slightly since eggnog is already sweetened.

Try making cheesecake, cinnamon rolls, pancakes, muffins or even coffee cake or pumpkin pie. The possibilities are endless!

I would love to know how you used your Homemade Holiday Nog! Shoot me an e-mail HERE

Have a Happy Holidays Everyone and Cheers! This recipe’s on me!


Fried Green Tomatoes


Wayy more than just a movie, Green Tomatoes are an End-Of-Summer Bonus!

images-16.jpeg

Autumn is officially here and for me it's hard to ever get truly excited about the harvest season drawing to a close. But green tomatoes offer a savory way to soften the blow.

green tomatoes

It's surprising how something as unexpected as unripened green tomatoes can brighten up a dish. 

So what exactly are green tomatoes? They’re not just any tomato that’s green in colour. Green tomatoes are late season red tomatoes that haven’t ripened, leaving them green and hard. They have tart, zingy flavor and a robust texture.

Green tomatoes are firm (though they'll soften upon cooking), moist but hardly dripping, and sour to the point of astringency. Sounds gross but it adds so much excitement to your meals!

IMG_6231.jpg

Their fresh flavour also works well in sauces

There thousands of dishes that use Green Tomatoes and you undoubtedly have a few recipes tucked away in an old family cookbook that Great-Grandsomeone would have made on a yearly.

Here are a couple ideas I want to share with you - REMEMBER - Recipies are guidelines! And Green Tomatoes are the perfect ingredient to experiment with.

This is your chance to Get Creative! Because it will always taste good when you start with Great, Farm-Fresh ingredients.

EASY FRIED GREEN TOMATOES

We would love to see you at the farm! Check our market hours HERE

INGREDIENTS

 
  • 3 medium, firm green tomatoes

  • Salt

  • 1 cup all-purpose flour

  • 1/2 cup milk or buttermilk

  • 1 egg

  • 1/3 cup cornmeal

  • 1/2 cup fine dry bread crumbs

  • 1/4 cup extra virgin olive oil

  • Seasoning of your choice (cajun, Mrs Dash or something you made up)

1. Slice and salt green tomatoes: Cut unpeeled tomatoes into 1/2 inch slices. Sprinkle slices with salt. Let tomato slices stand for 5 minutes.

2. Place coating ingredients in 3 shallow bowls: While the salted green tomato slices are resting, separate: 1- the flour and Cajun seasoning (if using), 2 - buttermilk and egg, and 3 - breadcrumbs and cornmeal.

3. Dip green tomato slices in flour, egg, then breadcrumbs: Heat oil in a skillet on medium heat. Beat the egg and the buttermilk together. Dip the green tomato slices in the flour-seasoning mix, then the buttermilk-egg mixture, then the cornmeal-breadcrumb mix.

4. Fry the green tomatoes: In the skillet, fry half of the coated tomato slices at a time, for 3-5 minutes on each side or until brown. Drain on paper towel.

These fried green tomatoes are fantastic served with MurrayHill’s Sweet Chili Sauce or Piper’s Pickled Peppers!

Green relish

Green tomato relish-chutney

INGREDIENTS

  • 3 cups apple cider vinegar

  • 3 cups white sugar

  • 2 tablespoons salt

  • 1 tablespoon mustard seed

  • 1 tablespoon celery seed

  • 6 cups seeded and finely chopped green tomatoes

  • 2 cups finely chopped red bell peppers

  • 2 cups finely chopped red onion

  • 2 cups finely chopped Granny Smith apples

  • Canning jars with lids and rings

    Directions

  1. Cut tomatoes, onions. apples and peppers into wedges. In a food processor, cover and process in batches until finely chopped. Stir in salt. Divide mixture between two strainers and place each over a bowl. Let stand 3 hours.

  2. Discard liquid from bowls. Place vegetables in a stockpot; stir in vinegar, sugar, celery seed and mustard seed. Bring to a boil. Reduce heat; simmer, uncovered, 30-35 minutes or until thickened.

  3. Carefully ladle hot mixture into eight hot pint jars, leaving 1/2-in. headspace. Remove air bubbles and adjust headspace, if necessary, by adding hot mixture. Wipe rims. Center lids on jars; screw on bands until fingertip tight.

  4. Place jars into canner with simmering water, ensuring that they are completely covered with water. Bring to a boil; process for 10 minutes. Remove jars and cool.

Fried Green Tomato Parmesan

Add MurrayHill’s Luscious Ground Beef to make a meal that covers all the bases!

green tomato parmesan

Ingredients

  • 2 large eggs eggs

  • 4 cups Italian seasoned bread crumbs

  • 10 medium Green Tomatoes, sliced 1/2-inch thick

  • 6 cups spaghetti sauce, divided

  • 1 (16 ounce) package shredded mozzarella cheese, divided

  • ½ cup grated Parmesan cheese, divided

  • ½ teaspoon dried basil

DIRECTIONS

Step 1 Preheat oven to 350 degrees F (175 degrees C).

Step 2 Whisk eggs in a small bowl until smooth. Pour bread crumbs into a shallow dish. Dip each tomato slice in egg and coat with bread crumbs. Arrange on baking sheets in a single layer.

Step 3 Bake in the preheated oven until golden, about 5 minutes per side.

Step 4 Pour 3 cups spaghetti sauce into the bottom of a 9x13-inch baking dish. Top with a layer of tomato slices. Layer half of the mozzarella cheese and Parmesan cheese on top. Repeat layers with remaining spaghetti sauce, tomatoes, mozzarella cheese, and Parmesan cheese. Sprinkle basil on top.

Step 5 Bake in the preheated oven until golden brown, about 35 minutes.

So, YES! You can eat Green Tomatoes and accepting them as a distinct (and worthy) ingredient really pays off. 

If you have an awesome way to prepare Green Tomatoes, I would LOVE to know! E-mail me to SHARE or if you have any QUESTIONS or maybe I’ll see you at the farm!

Bountiful Beans!

Vegetable gardening is really a feast or famine experience.

The anticipation of fresh, flavourful produce causes a lapse in reasoning when planting out seeds in the spring and it seems I never remember how many beans a 100 foot row actually produces!

And this year my failing memory had me plant 400 - yes 400 - feet! Well….Wow. Thats a LOT of beans! Lol.

pickled beans yellow

Don’t get me wrong, I LOVE beans! almost as much as sweet corn and now I'm learning new ways to enjoy them and keep them over the winter.

After quite a few trial and errors, I have found my new favourite way to preserve beans.

Pickling them helps retain their crispy texture and they look and taste amazing.

The results have been so positive that I simply have to share the recipe with you!

Now this recipe is just one of hundreds of variations and I always encourage you to tweak a recipe and make it your own. That’s what I did with this one.


They come out bright, crispy, refreshingly tangy/sweet and way too yummy to just eat one in your Ceasar! You really have to try them! 

This recipe should make 3 one litre jars

IMG_6253.jpg

You’ll need:

  • 3 one litre jars with lids and rings

  • 3 quarts of fresh beans from your local farmer or market

  • 1 sweet white onion cut into large chunks

  • 9 large garlic cloves (not bulbs)

  • 3 fresh chili or jalapeño peppers sliced in half lengthwise

  • 6 cups of pickling vinegar

  • 1 1/2 cups of sugar

  • 1 1/2 tsp tumeric

  • 2 tsp pickling salt per jar

A large stock pot and rack that fits inside to process jars

  1. Sterilize your jars and lids in boiling water or in your dishwasher on sanitize mode.

  2. Trim the ends off the beans and rinse thoroughly with very cold water

  3. Bring vinegar, sugar and tumeric to a boil and keep hot while packing jars

  4. Pack jars with 4 or 5 chunks of onion, 3 cloves of garlic, a chili pepper and as many beans as you can possibly fit in.

Really pack them in!

  • Trim any beans that may be too long for the jars and add 2 tsp of pickling salt

  • Pour hot brine over the beans and leave 1/2 inch space at the top.

  • Screw on lids finger tight - don’t crank them!

green beans

Place the rack inside your stock pot and place your jars in and fill with warm water to just the bottom of the rings. Heat until boiling. Once boiling, process (continue boiling gently) for 10 min.

Carefully remove jars (canning tongs are super useful here) and place them on a clean towel to cool. The lids should “pop” as they cool indicating that they are sealed and can be stored in a cool dark place for the winter - But they won’t last that long, believe me!

A word of caution when filling jars with brine: Be careful not to spill tumeric or brine on your counters or on clothes.

Tumeric STAINS something awful!

tumeric stain

I think this might come out with a little baking soda and a lot of elbow grease.

Finished pickled beans

Let me tell you,

The effort is well worth it

As you can see, this jar has barely made it a day in our fridge.

Above all, and as always, have fun with it.

Do you have a great recipe or variation for awesome pickled beans?

I would love to know if you want to share! Hit the button below and connect with me personally. Cheers and happy pickling!

My Secret Caesar Salad Dressing!

Homemade-Caesar-Salad-Dressing-1200x1401.jpg

Caesar Salad is Classic.

It works at any time of year, can accompany any meal and is generally THE salad that the men in our lives have no problem eating!

My first job as a young teen was working for an amazing catering company who’s famous ceasar salad was a popular menu choice.

What I love about this recipe is that anyone can make it with ingredients you have in your kitchen TODAY.

No need to run to the grocery store for anchovy paste - because who has anchovy paste just sitting around!

IMG_2430-2.jpg

You might think that the lack of fancy ingredients will result in a bland, boring dressing WRONG!

This dressing is rich, creamy, garlicky and so easy!

Last but not least, don’t skimp on the romaine lettuce by using those tasteless cores that come in bags of 3

IMG_6183.jpg

Do your salad justice!

Source out some farm-fresh locally picked romaine heads from your local market

MurrayHill’s Secret Caesar Salad Dressing

1 cup olive oil

1 soft boiled egg (3 minutes)

2 cloves of garlic (crushed and minced)

1 tsp Worcestershire sauce

juice of 1/2 a lemon

1 8oz package of cream cheese

1/2 cup parmesan cheese

milk or yogurt

salt and pepper to taste

Blend all ingredients ( a food processor works great for this but you can use a mixer too) except milk or yogurt. If needed, use some to thin to desired consistency.

I like mine fairly thick so I rarely use any.

This will keep in the fridge for 2 weeks

This dressing also makes a wicked dipping sauce for pizza or garlic bread!

A Magical Children’s Garden

My first ‘real’ veggie garden was a work of art dedicated to my daughter.

She was 3 and I wanted it to be Magical. A place where the Fairies loved to play. 

path-in-garden-m.jpg

I was lucky to have room to make it large - about 20’ x 30’ but it wasn't the size that made it cool, it was the layout.

I threw out the concept of rows altogether, infact, I dismissed all the rules. (I was never one for rules anyway)

There were no straight lines!

teepee.jpeg

Leslie’s garden foundation was a long winding path that started in one corner and snaked its way through the vegetables and flowers to a Teepee of scarlet runner beans where she could sit and have a snack. 

The path would make a turn at a zucchini bush, tunnel through a patch of sweet corn and under an arbour of cucumbers and nasturtiums. 

magic+garden.jpg


The route was defined and bordered by bush beans, lettuce, dill and broccoli and had stones to step through fragrant thyme and oregano.

I made corners and walls with joyful sunflowers and trellised peas and interspersed the whole thing with tomatoes in cages and patches of carrots and beets. 


Never once, while you were in it, could you see the garden in its entirety. 

Canva+-+Yellow+Brown+Sun+Flower+during+Daytime.jpg


It was a time before cell phones and widespread internet and I regret never having taken a photo. But I can still visiualize how it looked and remember the fun Les and I had in it. 


The bounty harvested that season was more than just veggies but the experiences had and memories it made for us.

In the end, that ‘crazy’ garden I created really wasn’t any harder to plant or maintain than if I had stuck to conformity but the reward was ten-fold!


Point is, have fun with it! Change your perspective and get down to 3-year old levels.

Even by incorporating one element

the path, t-pee, a block of wood to sit on, a tunnel or stepping stones, you add dimension and magic to your space.

For tips on selecting seeds and planting out, check out my other posts “Growing your Own Garden PART #1 and PART #2

Make this year’s garden fun for everyone! It will be AWESOME!


Grow your own garden Part #2 Planting Out

120475743-farmer-s-hand-planting-seeds-in-soil.jpg

No one understands the uncontrollable desire to get seeds in the ground more than me. It is almost impossible to walk away from that freshly tilled black earth on those first warm sunny spring days in April - but I do.

The Peepers have to shut up 3 times.

It’s an old rule told by Grandpa Murray (hence MurrayHill Farm but that’s another story) whereby the frogs in the pond field start singing after the spring melt. They will sing day in, day out until the weather turns cold and they are quieted for a time until they sing again. Once they do this three times, it is safe to start planting!

Click to hear the Peepers!

Click to hear the Peepers!

Listen to our Peepers in our pond field HERE

For those of you without a pond field, there are many resources to go by, Farmers almanac, Moon phases but generally, you can find your Plant Hardiness Zone and follow the recommended planting dates.

For ideas on What Seeds to Grow When, check out

Grow Your Own Garden Part 1

so, Ready, Set…Plant

Here are a few tips for planting out in your garden.

images-10.jpg

TIP #1 Go to Beds

Forget the idea of single rows and adopt a system of beds instead. Make your “row/bed” 24”-30” wide so that you can easily reach the centre from either side.

Orient your beds North/South so every row gets the most sunshine.

Within that bed, you can sow 4 rows of radishes, onions or spinach 6” apart, 3 rows of carrots 8” apart, 2 rows of beets, beans, chard 12” apart etc. You get the picture. This method minimizes space wasted on walkways.

TIP #2 Go Vertical

unnamed-2.jpg

Every opportunity you get, grow up!

Be it on a fence, trellice, or a simple t-pee made from 3 stakes, vertical growing is the best way to maximize space. Tomatoes, peppers, peas, cucumbers, melons, pole beans, even winter squash gan go UP.

Think, an old step ladder, swing-set, wires bent into a dome, or hockey sticks

even other plants like corn or sunflowers can be supports

Keep in mind that your trellised veggies will create a “wall” that will shade plants to the north and limit sunlight to the beds on either side. Take advantage of this and plant cooler growing crops like lettuce and spinach along the north or East side.

TIP #3 Interplant for Veggies ‘till Christmas

Check the seed packet or catalogue information

Every vegetable variety has a Days To Maturity (DTM) that indicates how long it needs to grow before harvest.

Start counting when seeds germinate or from transplanting. DTM will be more the later in the season it gets due to shorter day lengths.

Within your wide beds, you can interplant short DTM veggies like radishes, salad turnips, early carrots and leaf lettuce alongside longer DTM’s like late tomatoes, peppers, eggplant, brusselsprouts and cabbage.

TIP#4 Plan to double crop

What-Does-Days-to-Maturity-Mean-on-a-Seed-Packet-or-Vegetable-Starts.jpg

For instance, along the centre of a row, plant out your Brussel sprouts. On one side, plant two rows of radishes, on the other plant a 6” band of leaf lettuce. By the time your sprouts are filling out the bed, the other crops will be in your tummy!

A bed of leafy greens, peas, green onions and radishes can be harvested in mid-july and re-planted to carrots and beets for a fall harvest.

TIP#5 Don’t plant radishes like you’re planting potatoes!

Plant seeds no more than 3 times deep as they are big.

Keep seed bed warm and damp for a few days by spreading black plastic, cardboard, or newspapers. Just be sure to remove it as the seeds germinate. Check daily after 3 days. This is especially useful with carrots that can take 10 days to germinate.

Here is a really neat idea for sowing carrots that uses a home made gel to sprout and plant carrots. I personally have not tried but seems to have some merit and I would certainly give it a go on a small scale.

So get out there! Get creative! Involve your kids! It will be AMAZING!

Stay tuned for Part 3 of Growing Your own Garden!

Grow your own garden part 1: Planning & Anticipation

“The act of planting a seed is an act of faith in tomorrow. During this time of limited movement, a garden is a place to find solace, joy and wonder, and hopefully some great things to eat.” (N. Astrid Hoffman with The Living Seed Company).

Canva - Dig Garden.jpg

We are baking, cooking and rediscovering our beautiful relationship with food

Why not take it one step farther and grow your own food at home this year?

Canva - Assorted Spices on Black Cooking Pan.jpg

I know the prospect of weeds and waiting can be daunting but IF you keep your garden small, the little effort will be thereapeutic and fruitful!

Now is the time to Plan, Dream and get EXCITED for the season before us 

 How to decide what you are going to plant and what seeds you need to order

  1. Consider how much space you have outside for a garden and if you will be using containers or raised beds.

You will be surprised at how much you can grow in a 6x8’ plot

Find a space that gets at least 6-8 hours of sunlight per day

Have a small plot already? Amazing! You’re away to the races.

raised bed

No soil ready in your back yard NO PROBLEM! Raised beds or container gardening can be your solution this year! There are so many resources out there outlining BOTH these techniques that produce incredible results!


2. Determine if any of your crops need to be started early and transplanted

It is not too late to start from seed!

Vegetables to start indoors now: Squash, Watermelon, Cucumber, Basil

unnamed.jpg

 You can also order your garden plant kit from me that includes

4 Tomato and 4 Pepper plants

ready for transplant in mid-may!

Do you have some egg cartons hanging around? Use them to start your indoor plants and plant them directly into the garden in May.

Strong light is absolutely necessary for healthy transplants. A south facing window will do for a little while but you will need to provide your plants with some sheltered outside time where it is brighter and cooler so they don’t get ‘leggy’

A 4’ flourescent work light is a great option especially if you can elevate your seedlings so that they are no more than 3-4” from the bulbs. 

In the Garden now: Peas, Radishes, Kale, Swiss chard, Carrots, Beets, Onions

images-8.jpeg

These vegetables will tolerate a few cold nights. Remember, the soil is still quite cold and germination will take longer than usual. If you are able, you can warm the soil by covering with a black plastic bag for a few sunny days.

Veggies that like it hot for later:

Tomatoes, Cucumbers, Peppers, Eggpplant, Corn, Beans, Squash,Watermelon, Pumpkins


3. You’re ready to order your seeds! There are many seed companies out there but many of them are experiencing delays in filling orders due to the demand this year.

EVERYONE is putting in a garden this year!

These are some companies that I order from but by no means is this an exhaustive list! I encourage you to try something local and small. Many small farms are starting to save seeds and could use the extra cash right now.

images-7.jpeg

Seed companies:

Veseys,

Stokes

William Dam’s

So get planning everyone! Get your hands dirty and Grow!

Stay tuned for part #2 for Tips on Planting out Your Garden!

Become part of our farm family so you can be the first to know!

It all started with Mr. Dressup

You maybe didn’t know this about me but my very first love was Art.

It started with Mr. Dressup. I was fascinated by his cartoons and how a few lines with his sharpie made his flip-board come to life.

And my dad would play a game where I guessed what image his scribbles would develop into long before he was finished. 

From as far back as I can remember, I was always drawing.

IMG_5352.jpg

I was very fortunate that my Grandmother taught me, during weekly lessons as a child, the mechanics of drawing and painting.

but above all, she taught me to SEE.

To see things as they really are and not as your mind would think they are.

How snow is not white but different shades of blue and grey - even pink or purple.

How a chair has 4 legs but you really may only see 3. And they are different lengths!

IMG_4064.jpg

Life on the farm has become my new inspiration.

There are so many new truths to observe.

A young calf with ‘milk face’, the uniqueness of each cow’s nose print, how every ‘cow lick’ on their foreheads is their’s alone.

IMG_4091.jpg
IMG_5056.PNG

“I can’t draw” you say.

Perhaps you have other talents but everyone can practice the

Art of Observation.

The act of seeing the truth of what is.

Akin to stopping to smell the roses, taking to time to REALLY look can prove therapeutic - almost meditative - and a great exercise for the mind and soul.

 
IMG_3604.jpg

Lately, I have had the honour of sharing some of my work through the Limousin Associations as prizes and fundraising auction items and

I’m so excited to launch my very first collection of Fine Art Reproductions!

Availability of these works has been much anticipated (so I’m told) by folks who are inspired to have my art

tell a chapter of their own story

The farmer in you has a unique story too!

Perhaps some of my work speaks to you and can serve as a reminder of your greatest moments, achievements and future goals. I would be honoured to help! Send me and e-mail if you would like me to capture the spirit of a chapter in your book. info@murrayhillfarm.ca

Above all, make time to smell the roses and while you’re at it, take a REAL GOOD look at it!

The Naming of the Calves

IMG_5200.JPG

Every year, the beginning of January marks a new calving season here on the farm. It is altogether an exciting, exhausting, miraculous and humbling time of year full of challenges, thrills, victories and defeat.

Its no surprise that it is one of my favourite times on the farm.

Last year we increased our cow herd by over 300% and are now awaiting the birth of MANY more calves. In our Limousin Breed, the yearly calf crop is assigned a letter (this year it is H) and breeders register their calves with names or tag codes that correspond with that letter.

Are you a Limousin Breeder? Check out our Cattleman’s page HERE

Fun Challenge-How many H names can YOU think of?

At Murrayhill Farm we take the naming of the calves another step further and try to maintain our Dam and Sire lines so that our genetics are more readily traced. For instance, we have a cow named Xena who carries a Greek line with daughters named Athena and Demeter. Another matriarch, Sunflower has daughters, Apple Blossom, Baby’s Breath, Daisy, Foxglove…..you get the picture!

Just as important are the sires who’s names like Easy Money, Dillinger and Cadillack Jack give rise to offspring named Hard Earned Money, Hitman and Honey Jack (our booze line)!

Talk about great evening word puzzles!

IMG_5201.jpg

Do you have a great “H” name? We are always looking for awesome ideas!

And just to confuse issues, names must be something that I can actually call our babies because I talk to them all the time. So although one of our little girls may get registered as Hard To Miss, which is terribly awkward to say, her tag actually reads Missy even though she is an “H” calf!

Do you have THE best ‘H’ name? Please share with us!

IMG_3964.jpg

I will try to post more news and photos from the barn as the season progresses.

Stay tuned and be the first to know by signing up as a farm friend.

We would love to have you as part of our farmily lol!

IMG_5301.jpg

Zucchini Overload? Here’s a Few Fantastic Recipes for You…

Because you can only eat so much zucchini bread.

zucchini2forUP.jpg

Want a great way to take advantage of all the great tasting summer zucchini?

Here are 5 delicious ways to enjoy the season’s first bumper crop of fresh veggies!

There are tons of creative and delicious ways to use zucchini, but what if you don’t have enough time to put together an elaborate culinary creation every night?

NO Problem! Zucchini is fast, its simple, and deliciously refreshing on these hot summer nights.

Eat it raw, grilled, sauteed, baked, spiralized, and in smoothies!

Zucchini is one of my favorite vegetables and I like to treat them in ways that bring out their mild, nutty flavor and silky texture.

Try it for breakfast, lunch, dinner and in-between snacking.

healthy-crustless-zucchini-quiche3.jpg

Healthy Crustless Zucchini Quiche

Melt in your mouth healthy zucchini quiche without the crust. Tastes so good cold!

Ingredients

  • 7 cups (2–2.5 lbs) shredded zucchini (measured before squeezing)

  • 8 large farm-fresh eggs

  • 1/2 cup spelt or whole wheat flour

  • 1/2 cup any hard cheese, shredded

  • 1/2 cup Parmesan cheese, grated

  • 1/2 cup chives or green onions, finely chopped

  • 1 tsp salt

  • Ground black pepper, to taste

  • Cooking spray

Instructions

  1. Give shredded zucchini a good squeeze to extract as much water as possible. I do it by placing zucchini into a linen towel and wringing into a ball. Transfer to a medium bowl and set aside. Preheat oven to 400 degrees F and spray pie baking dish with cooking spray.

  2. In a medium bowl, add eggs and whisk. Add flour and whisk well to combine (it will take a few minutes). Add both cheeses, salt and pepper, and whisk one more time. To the bowl with zucchini add chives and using spatula mix, then pour egg flour mixture on top and stir well to combine.

  3. Transfer mixture to previously prepared baking dish and bake for 45 minutes or until toothpick inserted in the middle comes out clean. Broil for a few minutes for a golden crust. Cool off a bit, cut into 8 slices and enjoy warm or cold (I love cold quiche!).


WAFFLES Yep! Who Woulda Thought?

93d47c34-88b5-4ee6-b7ef-24f044048eb5_zucchini-bread-waffles_webready.jpg

INGREDIENTS

  • 2 cups grated zucchini, squeezed with paper towels

  • 2 carrots, peeled and grated

  • 3 cups all-purpose flour

  • 4 tsp baking powder

  • 1 tsp ground cinnamon

  • ½ tsp grated nutmeg

  • ½ tsp kosher salt

  • 4 Tbsp butter, melted

  • ¼ cup granulated sugar

  • 1 Tbsp vanilla extract

  • 2 ½ cups buttermilk, at room temperature

  • 3 large eggs, at room temperature

  • Nonstick cooking spray, for spraying the waffle iron


Directions

1. Preheat the waffle iron to the regular setting.

2. Toss together the zucchini and carrots in a bowl. Mix the flour, baking powder, cinnamon, nutmeg and salt in a separate bowl, then toss with the zucchini and carrots to coat them.

3. In a separate pitcher, mix the buttermilk, melted butter, granulated sugar, vanilla and eggs. Pour the buttermilk mixture over the zucchini mixture, stirring gently.


ZUCCHINI FRITTERS

Zucchini-Fritters.jpg

Unbelievably easy to whip up. Simply grate your zucchini, drain them completely using a dish cloth, and throw them in a bowl with all of your other ingredients. From there, scoop them right out onto a hot skillet, flattening them up to resemble a pancake. Flip, cook, serve. Easy enough, right?

INGREDIENTS:

  • 1 1/2 pounds zucchini, grated

  • 1 teaspoon salt

  • 1/4 cup all-purpose flour

  • 1/4 cup grated Parmesan

  • 2 cloves garlic, minced

  • 1 large farm-fresh egg, beaten

  • Kosher salt and freshly ground black pepper, to taste

  • 2 tablespoons olive oil


DIRECTIONS:

  1. Place grated zucchini in a colander over the sink. Add salt and gently toss to combine; let sit for 10 minutes. Using a clean dish towel or cheese cloth, drain zucchini completely.

  2. In a large bowl, combine zucchini, flour, Parmesan, garlic and egg; season with salt and pepper, to taste.

  3. Heat olive oil in a large skillet over medium high heat. Scoop tablespoons of batter for each fritter, flattening with a spatula, and cook until the underside is nicely golden brown, about 2 minutes. Flip and cook on the other side, about 1-2 minutes longer.

  4. Serve immediately.


ZUCCHINI DIP 

The list of ingredients is simple, but this dip has so many layers of flavor and a wonderful texture. It's a keeper! 

INGREDIENTS:

Hot-Zucchini-Dip-6-266x400.jpg.jpg
  • 4 or 5 small/medium zucchini/squash about 2 1/2 lbs

  • 2 med/large tomatoes 1 lb

  • 1 hand-full fresh basil about 2 Tbsp chopped

  • 16 oz cream cheese = two 8 oz packages

  • 2 cloves of garlic or 1 tsp garlic powder

  • 1/2 tsp sea salt or to taste

  • 1/8 tsp black pepper or to taste

  • Crackers chips, or fresh French bread to serve

DIRECTIONS:

  1. Pulse tomatoes in a food processor several times or until coarsely chopped. You can also finely dice tomatoes by hand if you don't have a food processor.

  2. Heat a large heavy bottomed pan over medium heat. Add finely chopped tomatoes, 2 pressed garlic cloves and 2 Tbsp chopped fresh basil. Simmer covered for 10 min, stirring occasionally and pressing on any larger tomato pieces to soften them. The mixture should look like a tomato sauce when done.

  3. Cut off and discard ends of zucchini and shred zucchini on the large holes of a grater. I used the grater attachment on my food processor and it sure was quick! Add grated zucchini to the cooked tomatoes and stir to combine.

  4. Increase heat to medium/high, cover with lid and cook for 20-23 minutes, stirring occasionally or until zucchini are fully softened.

  5. Add 16 oz cream cheese pieces and stir until fully melted into the zucchini mixture. It will be creamy. If your dip seems too thick, you can thin it out a little with hot water. Season with 1/2 tsp salt and 1/8 tsp black pepper, or to taste and serve hot or warm. This re-heats beautifully, just stir in a drizzle of water and heat it up on the stove-top.


* This makes a large batch-Great for entertaining- but I would halve the recipe for a simple night with family.


ZUCCHINI SHRIMP SCAMPI

So fast andThis traditional shrimp scampi is made into a low-carb dish with zucchini noodles. Can also use scallops or whitefish chunks.

IMG_8182edit.jpg

INGREDIENTS:

  • 2 tablespoons unsalted butter

  • 1 pound medium shrimp, peeled and deveined

  • 3 cloves garlic, minced

  • 1/2 teaspoon red pepper flakes, or more, to taste

  • 1/4 cup chicken stock

  • Juice of 1 lemon

  • Kosher salt and freshly ground black pepper, to taste

  • 1 1/2 pounds (4 medium-sized) zucchini, spiralized

  • 2 tablespoons freshly grated Parmesan

  • 2 tablespoons chopped fresh parsley leaves


DIRECTIONS:

  • Melt butter in a large skillet over medium high heat. Add shrimp, garlic and red pepper flakes. Cook, stirring occasionally, until pink, about 2-3 minutes.

  • Stir in chicken stock and lemon juice; season with salt and pepper, to taste. Bring to a simmer; stir in zucchini noodles until well combined, and steam for about 3-4 minutes.

  • Serve immediately, garnished with Parmesan and parsley, if desired.


My absolute FAV go-to method of cooking zucchini is ON THE GRILL!

Simply cut fruit in half, brush with oil and season with salt and pepper and grill until just softened but not mushy.

Or layer slices into your lasagna.

Spiralize zucchini (I’ve tried this and its amazing!)

Chop it into thin quarter-rounds for salad, or slice it paper-thin lengthwise and make a fancy, lemony carpaccio.

Cut it into little sticks and dip it in your favorite dip. Or dust with flour before frying it in generous olive oil. Marinate and grill it.

As you can well see there are THOUSANDS of ways to prepare zucchini,

And of course, there’s always zucchini bread.

Studded with walnuts and sweet spice, it’s perfect for an afternoon pick-me-up with tea and a friend.

YUM!